Named User product license management
For a Named User type product license, when a license is requested by a Planning Space client application, the user's identity is checked against a list of 'named users' which is contained inside the license file.
The checking is based on the Windows UPN (User Principal Name) that has been used to login to the corporate IT environment. It is not the Planning Space user account ID that has been used to connect to Planning Space, although the user ID and the UPN may be identical.
The list of named users must be managed by the IPS/Planning Space administrators using the Client Portal at 'https://clients.aucerna.com'. Quorum Support will set up a license record in the client portal, and provide portal user accounts for nominated administrator users.
A new XML license file must be generated (in the client portal) and installed (in IPS Manager) whenever the list of named users is changed. This is explained below.
Note: When license profiles are enabled for a Planning Space application, any Named User licenses applicable to that application will be disabled. If user-based access control to licenses is required this can be implemented through the license profile feature. See License profiles.
Note: Version 20.3 Update 1 contained a fix for an issue where duplicate licenses could be consumed due to different UPN identities (Windows ID, Planning Space ID) being used for the license request by the Planning Space client application. To prevent multiple identities, a new default behavior was introduced so that the client will always use the Planning Space ID. This impacts on deployments which are using Named User product licenses, because those licenses will typically be based on users' Windows UPNs; however there will be no conflicts if the Planning Space username is identical to the user's Windows UPN, which for SAML2 user accounts is most likely be the case. Administrators can override the default behavior by changing the application setting 'License.UseWindowsIdentity' to True (this is individually set for Dataflow, Economics, and Financials). Alternatively, the Named User license must be modified to use the Planning Space ID for each user; Administrators can make this change on a self-service basis using the Client Center.
Manage a Named User license in the Client Portal
Login to the Client Portal at https://clients.aucerna.com using the user account provided by Quorum Support.
Click the user icon at the top right of the page, and select Licenses:

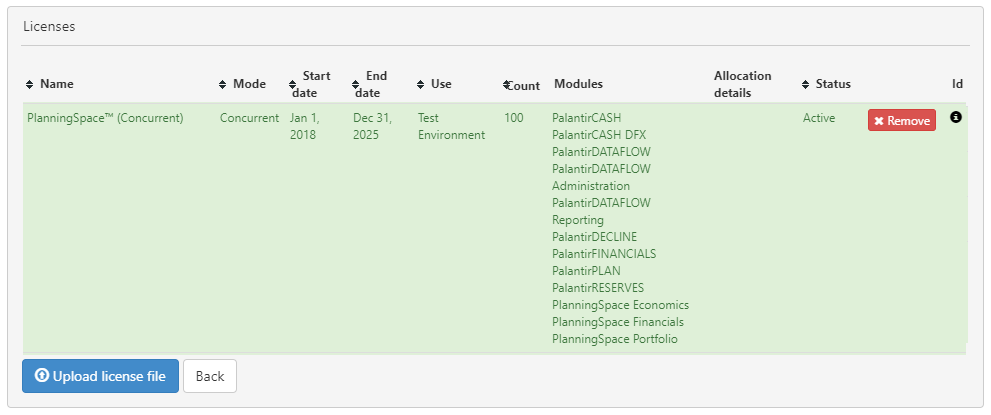
This should open the Licenses management page:

This page has two sections. The top part (see the screenshot above) lists the license records, and Named Users can be edited in the User allocation area at the bottom of the page (see the screenshot below).
If you click the expand button ⊞ at the left-hand side of a license record, you will see the license details. For a Named User type license, the User Allocation field will show a status message 'X out of Y allocated' (i.e., the license is for a maximum of Y users, and X users are currently set as active and can use the license). If you click the status link you will see the current list of active users in a dialog box.
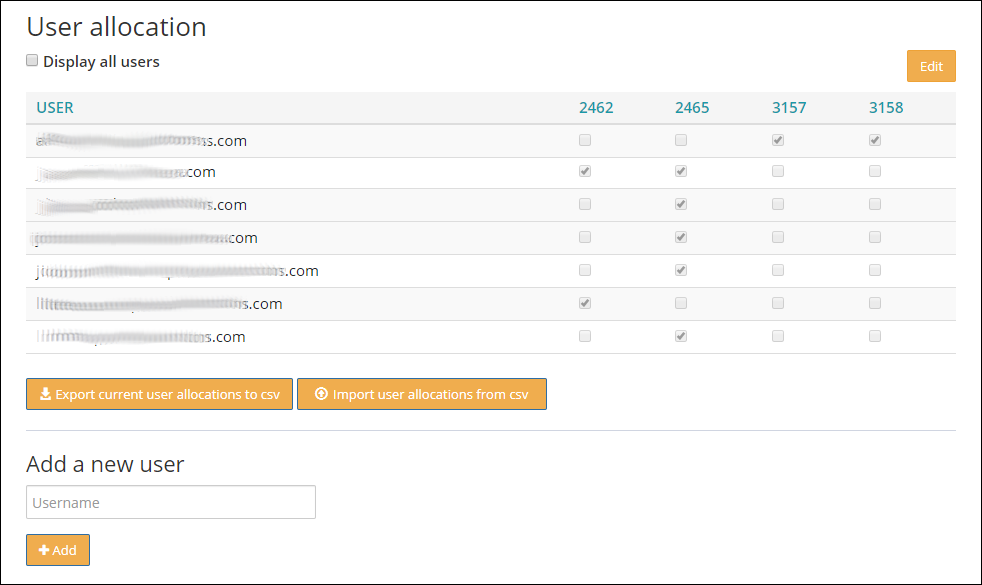
To edit the license make a note of its Id number ('2462' in the example screenshot above), and make sure that the tick box next to the Id number is ticked. Now move down the page to the User allocation table:

The User allocation table shows a list of 'Named Users' and there will be a column for each license record. Note: if the tickbox mentioned above is unticked then the license record will not appear in this table.
Users that have a tick in a column are set as active users and are enabled to use that license in a Planning Space session. The default user list is filtered; check the Display all users checkbox to show all named users in the list.
Click the Edit button. You can now check or uncheck any user in a license column; the maximum number of users that can be checked in a license column at any time will be equal to the user capacity of the license.
To add a new named user, type the UPN username in the Add a new user input field and click the + Add button. The input will be checked for valid UPN format.
Click the Save changes button to store the changes that you have made, or click the Cancel/Reset button to forget the changes. You will see an update message and a Download button for the new license file:

You can now download the new XML license file and upload it using IPS Manager (see below). You can access the license file at a later time using the Download button for each license in the Licenses table.
Bulk user management
If there are a large number of named users to be managed, then instead of editing in the management interface you can download a CSV file containing the current named user records. Clicking the Export current user allocations to csv button will download a file 'user_allocation.csv' into your default download location.
The CSV data has a row for every registered username, and a column for every license ID. Cells contain TRUE if the username is set to be able to use that license, otherwise FALSE.
You can edit the data externally using Active Domain user management tools, and upload a CSV with modified named user records, using the Import user allocations from csv button.
Quorum Support can advise on tools and scripts for named user management.
Click the Save changes button to store the changes that you have made and close the editor. You can now download a new XML license file and upload it using IPS Manager.
Generate and install a license file
When the named user list for a license has been updated, you can click the license's Download button which will generate an up-to-date license file and download it to your local file system.
Important: The license file will be keyed to a specific license server domain name and it must be uploaded into Planning Space by logging in to IPS Manager on that server (if your deloyment is a server cluster then you cannot use the load balancer address, it must be the specific server address). Also note that XML license files are 'single use': if a license is installed and then removed for any reason, the original XML file cannot be used a second time. Contact Quorum Support to request changes to the registered license server address for your deployment.
Login in to IPS Manager on the server, click Product licensing in the left-hand side menu. Click the Edit licenses button.

Click the Upload license file button, and use the file explorer dialog to locate the XML file. The new license record will appear in the list.
(Note: although the XML files are plain text, it is recommended that you only use the original copy of the downloaded file and do not do any cutting/pasting of the contents because this can cause issues with the license validation process.)
You should Remove the old license record for this Named User license. However, if there are active user sessions you will need to do a maintenance shutdown/restart of the IPS Service in order to remove the old license record and put the new record in place for all users.
